

Revision of Virtualization using KVM from Fri, 01/23/2015 - 02:51
The revisions let you track differences between multiple versions of a post.
1. Checking for virtualization support on your hardware.
Run the following command on your terminal.
grep -E 'svm|vmx' /proc/cpuinfo
If you don't get any output check if your BIOS configuration during boot time allows you to enable virtualization as some device come with this feature. If your BIOS has no such option, your computer's CPU may not support virtualization.
2. Installation of required packages.
sudo apt-get install libvirt-bin qemu-kvm bridge-utils virt-viewer virt-manager
3. libvirt daemon
After the required are packages are installed start your libvirt daemon.
Although it would be running after installation, run the following command.
sudo /etc/init.d/libvirt-bin restart
Note: status/stop/start/restart are the options.
Add the current user you are logged in with to the "libvirtd" group.
sudo adduser $USER libvirtd
4. Bridging network interface.
Open the file "/etc/network/interfaces" in a editor and make changes according to the example file below.
Example for static ip network
##############################################################################
auto lo
iface lo inet loopback

auto eth0
iface   eth0    inet    manual

auto br0
iface   br0     inet    static
        address         192.168.1.10
        netmask         255.255.255.0
        gateway         192.168.1.1
        bridge_ports    eth0
#        bridge_stp      off  # uncomment this parameters,
#        bridge_fd       0    # if you face any issues
#        bridge_maxwait  0    # these 3 parameters are related
                              # to the spanning tree protocol
                              # to prevent looping of data packets
                              # in bridge mode

###############################################################################
Example for dhcp connections
###############################################################################
auto lo
iface lo inet loopback

auto eth0
iface   eth0    inet    manual

auto br0
iface   br0     inet    dhcp
        bridge_ports    eth0
#        bridge_stp      off
#        bridge_fd       0
#        bridge_maxwait  0

###############################################################################
For more details on bridging check man page of bridge utils.
man bridge-utils-interfaces
Reload your new network configurations by running the below command on your terminal.
sudo ifdown br0
Followed by:
sudo ifup br0
Note: The usage of "sudo /etc/init.d/networking restart" is no longer supported as suggested by the respective scripts, at least since Trisquel 7.0 LTS Belenos.
4.1 Checking network connections.
1. Run ifconfig to check if your network interfaces are up.
br0       Link encap:Ethernet  HWaddr 00:78:12:81:05:a6
          inet addr:192.168.1.10  Bcast:192.168.1.255  Mask:255.255.255.0
          inet6 addr: fe80::225:22ff:fe41:5e6/64 Scope:Link
          UP BROADCAST RUNNING MULTICAST  MTU:1500  Metric:1
          RX packets:3382 errors:0 dropped:0 overruns:0 frame:0
          TX packets:3420 errors:0 dropped:0 overruns:0 carrier:0
          collisions:0 txqueuelen:0
          RX bytes:3187503 (3.1 MB)  TX bytes:527993 (527.9 KB)

eth0      Link encap:Ethernet  HWaddr 00:78:12:81:05:a6
          UP BROADCAST RUNNING MULTICAST  MTU:1500  Metric:1
          RX packets:9631 errors:0 dropped:0 overruns:0 frame:0
          TX packets:9736 errors:0 dropped:0 overruns:0 carrier:0
          collisions:0 txqueuelen:1000
          RX bytes:10185985 (10.1 MB)  TX bytes:1163285 (1.1 MB)
          Interrupt:42 Base address:0x6000
2. Ping your gateway's IP address.
ping 192.168.1.1
3. Ping to any IP address or IP of your DNS server.
ping 106.186.17.181
#That's an OpenNIC DNS server
4. Ping "trisquel.info".
If there were no issues then you are ready to start installing your virtual machine.
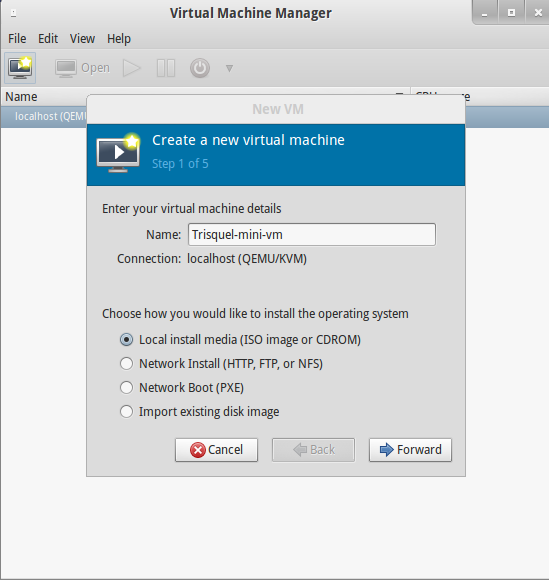
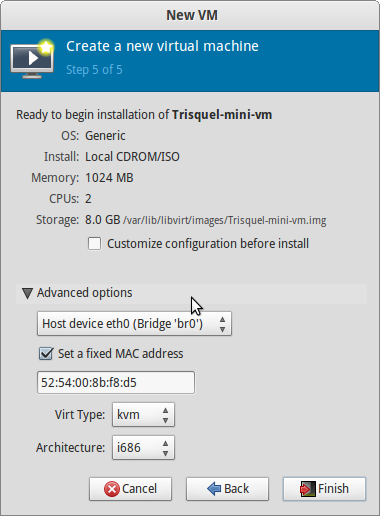
5. Virtual Machine Manager.
Start the virtual machine manager.
virt-manager
You do not need to run the above command as root or as "super user".
The screenshots below will guide you through the creation of a very simple virtual machine.


Issues
Some Intel Core2Duo CPU models don't support virtualization.
Run the following command.
grep name /proc/cpuinfo
In this case it is recommended to verify on manufacturer's website if your cpu supports virtualization.
It would be something like "VT" for Intel.
To-do: update with this info ...
http://trisquel.info/en/forum/complete-replacement-virtualbox