

Revision of Virtualization using KVM from Wed, 01/28/2015 - 12:52
The revisions let you track differences between multiple versions of a post.
Overview
This application provides a GUI tool for managing virtual machines via the libvirt library. It allows for the creation of virtual disks using the the following formats: raw, qcow, qcow2, cow, qed, vmdk, and vpc. You can manage the "virtual hardware" including dedicated RAM and CPUs. You can have control of local and remote machines either in graphical or text mode. State saving/restoration, pausing and rebooting through the GUI. Monitoring CPU load, memory usage and disk and network I/O. Adding various types of hardware to the virtual machine (including USB devices and disks).
The back end of virt-manager uses libvirt for managing Xen, QEMU & KVM virtual machines. The GUI is primarily tested with Xen and QEMU, but is intended to be portable to any virtualization backend that libvirt supports.
Installation and Basic Setup
Starting Note
It is very recommended to go over the settings prior to start creating/managing virtual machines. The default storage area is not within the /home tree and can lead to disk space shortage depending on your configuration.
1. Checking for virtualization support on your hardware.
Run the following command on your terminal.
grep -E 'svm|vmx' /proc/cpuinfo
If you don't get any output check if your BIOS configuration during boot time allows you to enable virtualization as some device come with this feature. If your BIOS has no such option, your computer's CPU may not support virtualization.
2. Installation of required packages.
sudo apt-get install libvirt-bin qemu-kvm bridge-utils virt-viewer virt-manager
3. libvirt daemon
After the required are packages are installed start your libvirt daemon.
Although it would be running after installation, run the following command.
sudo /etc/init.d/libvirt-bin restart
Note: status/stop/start/restart are the options.
Add the current user you are logged in with to the "libvirtd" group.
sudo adduser $USER libvirtd
4. Bridging network interface.
Open the file "/etc/network/interfaces" in a editor and make changes according to the example file below.
Example for static ip network
##############################################################################
auto lo
iface lo inet loopback

auto eth0
iface   eth0    inet    manual

auto br0
iface   br0     inet    static
        address         192.168.1.10
        netmask         255.255.255.0
        gateway         192.168.1.1
        bridge_ports    eth0
#        bridge_stp      off  # uncomment this parameters,
#        bridge_fd       0    # if you face any issues
#        bridge_maxwait  0    # these 3 parameters are related
                              # to the spanning tree protocol
                              # to prevent looping of data packets
                              # in bridge mode

###############################################################################
Example for dhcp connections
###############################################################################
auto lo
iface lo inet loopback

auto eth0
iface   eth0    inet    manual

auto br0
iface   br0     inet    dhcp
        bridge_ports    eth0
#        bridge_stp      off
#        bridge_fd       0
#        bridge_maxwait  0

###############################################################################
For more details on bridging check man page of bridge utils.
man bridge-utils-interfaces
Reload your new network configurations by running the below command on your terminal.
sudo ifdown br0
Followed by:
sudo ifup br0
Note: The usage of "sudo /etc/init.d/networking restart" is no longer supported as suggested by the respective scripts, at least since Trisquel 7.0 LTS Belenos.
4.1 Checking network connections.
1. Run ifconfig to check if your network interfaces are up.
br0       Link encap:Ethernet  HWaddr 00:78:12:81:05:a6
          inet addr:192.168.1.10  Bcast:192.168.1.255  Mask:255.255.255.0
          inet6 addr: fe80::225:22ff:fe41:5e6/64 Scope:Link
          UP BROADCAST RUNNING MULTICAST  MTU:1500  Metric:1
          RX packets:3382 errors:0 dropped:0 overruns:0 frame:0
          TX packets:3420 errors:0 dropped:0 overruns:0 carrier:0
          collisions:0 txqueuelen:0
          RX bytes:3187503 (3.1 MB)  TX bytes:527993 (527.9 KB)

eth0      Link encap:Ethernet  HWaddr 00:78:12:81:05:a6
          UP BROADCAST RUNNING MULTICAST  MTU:1500  Metric:1
          RX packets:9631 errors:0 dropped:0 overruns:0 frame:0
          TX packets:9736 errors:0 dropped:0 overruns:0 carrier:0
          collisions:0 txqueuelen:1000
          RX bytes:10185985 (10.1 MB)  TX bytes:1163285 (1.1 MB)
          Interrupt:42 Base address:0x6000
2. Ping your gateway's IP address.
ping 192.168.1.1
3. Ping to any IP address or IP of your DNS server.
ping 106.186.17.181
#That's an OpenNIC DNS server
4. Ping "trisquel.info".
If there were no issues then you are ready to start installing your virtual machine.
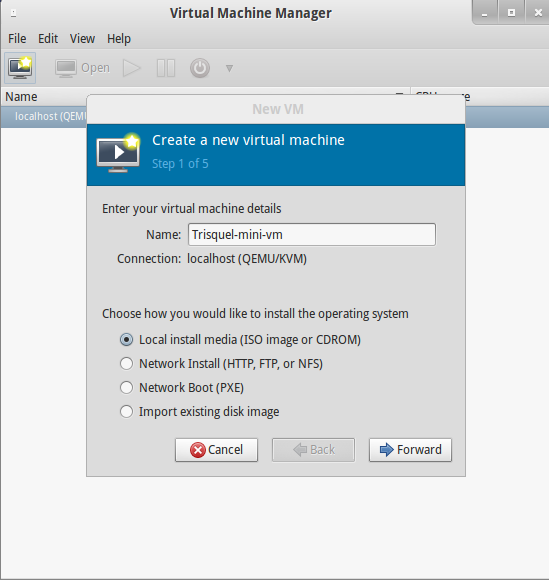
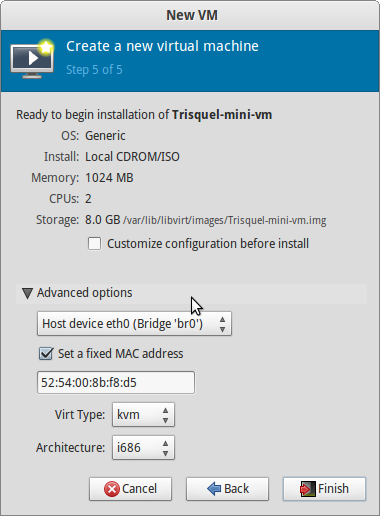
5. Virtual Machine Manager.
Start the virtual machine manager.
virt-manager
You do not need to run the above command as root or as "super user".
The screenshots below will guide you through the creation of a very simple virtual machine.


Access Control
To be able to access the libvirt socket and manage the virtual machines the user needs to belong to the "libvirt" group or have superuser privileges. Alternatively, you can use the session url links that look like "qemu:///session" for viewing.
Connecting a simple usb storage device
Note: The guest you want to share the device with should be powered off at the time of configuration, if it is a local virtual machine.
Go to the hardware details info for your guest and click on "Add Hardware". Choose the "USB host device" tab and then select the appropriately named device. Finish off with "Finish". It should be detected/mountable upon booting your guest.
Enabling bidirectional clipboard (host<->guest)
Starting Note
In order to support bidirectional clipboard, the guest machine has to install a package named spice-vdagent and not all distributions may provide. Therefore, it is best if you consult the repositories or consider building it from source(if possible).
Instead of VNC, the SPICE protocol will be used instead along with QLX graphics. No virtual machines should be running until it is time to install packages on the guest. For reference, the default video mode is Cirrus.
Necessary packages on the host
Install the following package to enable the viewing of SPICE guests.
sudo apt-get install python-spice-client-gtk
Close and reopen virt-manager to load the module, but it may be necessary to reboot as well, if you get the very suggestive message when trying to view the guest.
Configuring the virtual machine's hardware
Open the virtual hardware details window for whatever guest you are trying to configure. In the video tab, change the model to "QXL". In the Display tab, change the type to "SPICE". Click apply. Read the warning and you will have to accept to install SPICE channels on the guest.
Guest OS configuration
Power on your guest and verify that you can open up the viewer. Otherwise, reboot if you have not done so yet.
Install the spice-vdagent and check the output to see if the service has started (if you are running SPICE and QXL graphics the service should start automatically on Trisquel). For Trisquel install with the following command.
sudo apt-get install spice-vdagent
Reboot your guest.
Upon reboot check if the service is running.
sudo service spice-vdagent status
If it is running, you should now be able to copy and paste bidirectionally.
Enabling multidirectional clipboard (host<->guest)
To be tested.
Note: You should have to install spice-agent in all guests.
File sharing
SFTP, FTP and CIFS are all very accessible ways of sharing files when networks are involved. Otherwise, check the [http://www.linux-kvm.org/page/9p_virtio Project's Official Documentation] for clarification on adding a pass-through file system.
Troubleshooting
Core2Duo CPUs
Some Intel Core2Duo CPU models do not support virtualization.
Run the following command.
grep name /proc/cpuinfo
In this case it is recommended to verify on manufacturer's website if your cpu supports virtualization.
It would be something like "VT" for Intel.
Slow graphics performance
This can greatly depend on your configuration, hardware and hardware load, but using the SPICE protocol and QXL graphics over VNC can moderately improve graphical performance. See "Enabling bidirectional clipboard" in this page.
Resolution, scaling and graphical performance
The following results com from the following environment: Trisquel 7.0 host (GNOME Flashback), Trisquel 7.0 guest (Mini - LXDE), local guest, bridged networking on eth0, 2500 MB of RAM and 2 CPUS on the guest, Samsung NP530-U4B. I did not compare Network I/O, CPU load nor RAM usage.
Cirrus seems to be limited to 1280x768 and is only compatible with VNC.
VGA seems to be limited to 1280x768 , but it seems smoother than Cirrus.
QLX is both compatible with VNC and SPICE. It seems smoother than the previous two. It also seems more responsive in VNC than SPICE, but there is more tearing in the former. The white mouse does not really look good over GNOME Flashback's grey windows. Could not change mouse cursor. The resolution goes at least up to 1920x1080 on both protocols. The mouse seemed to disappear on occasion, but it still interacted with the Desktop.
I did not test Xen or VMVGA due to technical issues.
TODO: Test and optimize graphical performance.