Revision of Introduction to the Command Line from Thu, 08/08/2024 - 07:23
The revisions let you track differences between multiple versions of a post.
This manual covers the basics of using the command-line on your computer.
What is the command line?
The command-line interface or CLI is a direct interface between the user and the operating system. The CLI is used to interact with programs without GUI (Graphical User Interface). Some programs are made to be used solely through the command line interface, meaning they're designed to provide their full functionality through the command line, and therefore might not even have a GUI.
The command-line is commonly used to perform maintenance tasks and to edit files and settings. Think of the command-line as analogous to getting under the hood of your car and making precise, individual tweaks.
Why should I use the command-line?
- Using the command-line can be faster and more efficient than a GUI.
- The command-line allows for a wider range of automation opportunities.
- Many GUI programs offer customisable functionality in the command-line.
Accessing the command-line
The exact process for accessing the command-line differs between desktop environments. Regardless, start by locating your system's terminal emulator (commonly shortened "terminal") to get started.
| MATE (default on Trisquel 8) | Applications Menu –> Accessories –> MATE Terminal (or "Ctrl + Alt + T") |
| GNOME (default on older versions of Trisquel) | Applications Menu –> Accessories –> Terminal (or "Ctrl + Alt + T") |
| LXDE (found in Trisquel Mini) | Menu –> Accessories –> LXTerminal (or "Ctrl + Alt + T") |
| Xfce | Applications Menu –> System –> Terminal (or "Ctrl + Alt + T") (or "Super + T") |
| KDE | KMenu –> System –> Terminal Program (Konsole) (or "Ctrl + Alt + T") |
| Enlightenment | Menu –> Applications –> System –> Terminology (or "Ctrl + Alt + Insert") |
Inside the command-line: the prompt
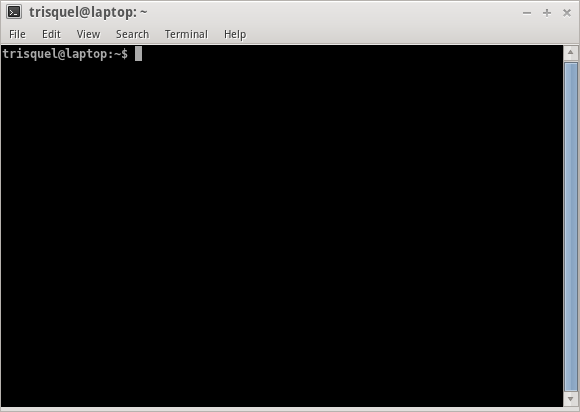
Regardless of what desktop environment you're logged in to, you should see a prompt window similar to the one below:

- trisquel – the username of the account you are using.
- laptop – the name of the computer you are logged into.
- : (colon) – everything after this marks where the current location is.
- ~ (tilde) – represents your home directory (for personal user files).
- $ – the command-line prompt ends with this character.
- If you are logged in as a super user (like root), the prompt will end with '#'.
Using the command-line
- To get started, type in a command and hit the Enter/Return key.
- Some commands are interactive. This means the program will ask for some kind of extra input (yes/no, passwords, text, arguments, etc).
- Command-line programs often come with manuals (man pages). You can read these "man pages" by typing in "man [command]".
- For example, the "man apt-get" command will return information on how to manage your packages (programs) via the command-line.
- To exit these manual pages and return to the terminal, simply press "Q."
- One important point: do not blindly enter commands without knowing what they do! Even small commands can do damage to a system.
Becoming a super user
A super user is a user that can carry out system-wide administration tasks. For example, installing software is a system-wide task that affects all users, therefore requiring super user privileges.
In Trisquel, the default user is assigned sudo privileges, which means that user has to re-enter their own password to temporarily become a super user. This is a much more safe approach than being a super user all the time.
Logging in as a permanent super user is a dangerous risk, which should be avoided. An example of a super user command is provided below:
sudo apt-get install apache2
The above command, when typed in a terminal, will use the apt-get program to install the "apache2" package. To run a program as a super user, execute: sudo [program] [parameters]
New users created in Trisquel won't have sudo privileges by default. To give a new user sudo privileges, do the following:
- Type the following, substituting [newuser] with the name of your new user:
-
sudo adduser [newuser]
-
- Use the default user account to run the following command:
-
sudo visudo
-
- Use the down key on your keyboard to scroll to the bottom.
- Type the following text at the end of the file:
-
[newuser] ALL=(ALL) ALL
-
- Next, press Ctrl + X to exit, and hit Y to save.
- Backspace the ".tmp" part of the filename, so it will read /etc/sudoers.
- Finally, press "Y" to override the file and save.
When you login to your new user account, it should now be able to run commands with sudo privileges.
Using Su to become a super user
The 'su' command is another way of becoming a super user. Su uses root account's privileges instead of your own. To use it, enter "su" in a terminal and enter the root password.
A '#' symbol should appear at the end of the prompt, meaning the following commands will be run as a super user.
To exit su, type exit. You will see the $ symbol, meaning that you are now using the system as a normal privileged user again.
Additional resources
This manual serves as a general introduction to the command-line. If you are interested in learning more, take a look at the documentation below:

