

How to Create a LiveUSB
The purpose of this manual is to instruct the user on how to make a bootable USB drive with Trisquel installed.
Note: be sure to read the last part (Checking data integrity) about running a md5sum check on the completed USB drive. If this check fails, it means an installation would probably fail. A failed installation might leave you with a formatted hard drive, but with no OS on it! Be careful and only initiate Trisquel installation from a USB drive where all the md5sum checks ran successfully. If a check fails, you need to re-create the bootable USB drive. if it fails again, try another USB drive.
Described methods
- Trisquel GNU/Linux (GUI: graphical user interface)
- GNU/Linux (terminal)
- GNU/Linux (UEFI-only)
- Windows (GUI)
- Mac OS X (terminal)
- Checking data integrity
Note: It is possible to enlarge the images via the button right click of your mouse.
Trisquel (Graphical)
- In the Main Menu go to System→Administration→Startup Disk Creator
- Select a source disk image or burned Trisquel disk and a designated device.

- Select Make Startup Disk.

- Wait until writing disk image is completed.

- A confirmation will display that the startup drive is complete.

Terminal (dd of GNU Coreutils)
To find out the device name, type in terminal:
$ lsblkThen unmount the USB:
$ umount /dev/sdX*# (e.g. /dev/sdc*); use asterisk (known as 'wildcard') to unmount all partitions on the USB.
Then write and transfer the image to the USB:
$ sudo dd if=/path/to/image.iso of=/dev/sdX status=progress bs=8M;syncNote that you want the device name (e.g. /dev/sdX) not the partition name (e.g. /dev/sdX1).
UEFI-only USB (7zip in GNU/Linux)
Sometimes, a machine can only boot a UEFI-only USB. Here's how this can be done:
Format the USB using gparted as fat32, with only one partition. Install p7zip. In terminal:
$ 7z x trisquel-amd64.iso -o/media/$USER/604A-00EA/Where 604A-00EA is the name of the USB drive.
(Adapted from https://askubuntu.com/questions/395879/how-to-create-uefi-only-bootable-usb-live-media)
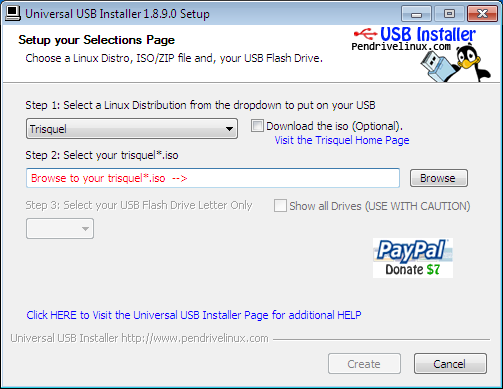
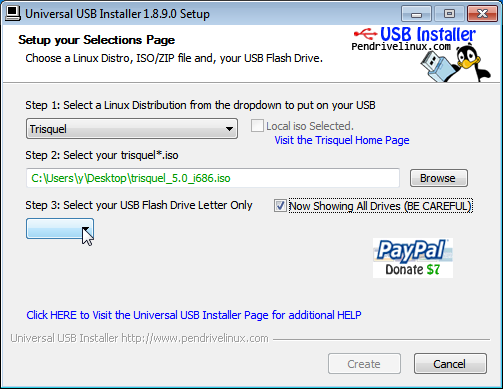
Windows (Universal USB Installer (GPLv2)
This manual is not an endorsement for the use of non-free operating systems. This manual is designed to help users migrate from non-free systems to free ones, as it is the case of Trisquel.The easiest way to get up an running with USB is to use the USB installer provided by pendrivelinux.com. You’ll need to download and install and follow the instructions.
- Insert a USB stick with at least 4GB of free space.
- Download UUI (Universal USB Installer).
- Select Ubuntu from the dropdown list.
- NOTE Trisquel is no longer on the dropdown in UUI.

Click 'Browse' and open the downloaded Trisquel ISO file.

Choose the USB drive and click 'Create'.
macOS (Terminal)
This manual is not an endorsement for the use of non-free operating systems. This manual is designed to help users migrate from non-free systems to free ones, as it is the case of Trisquel.- Download a Trisquel disc image from our download page.
- Open the Terminal from Applications/Utilities.
- Convert the .iso file to a .img.
Type (according the name of the path to the file):
$ hdiutil convert -format UDRW -o ~/path/to/trisquel.img ~/path/to/trisquel.isoThis will create a file with a .img.dmg extension. Type the following to rename this file.
$ mv ~/path/to/trisquel.img.dmg ~/path/to/trisquel.imgTo display the list of devices currently attached type:
$ diskutil listInsert your USB stick with at least 2GB of free space, then type:
$ diskutil listagain to figure out the device file assigned to your USB stick (e.g. "/dev/disk2").
Now type:
$ diskutil unmountDisk /dev/diskNwhere N is the number from the last command (If your USB stick is "/dev/disk2", N would be 2).
Then type:
$ sudo dd if=/path/to/trisquel.img of=/dev/rdiskN bs=1mIf you see the error message "dd: Invalid number '1m'", replace "1m" with "1M" in the previous command.
To finish:
$ diskutil eject /dev/diskN
Checking data integrity
Note: For now, this part only describes how to do it in GNU/Linux. Please expand this manual by adding information on how to do this on other OSs.
After the bootable USB drive has been created, mount it (this should happen automatically, when you connect the USB drive and select it inside your filemanager). Open your terminal and cd into the directory, where the USB drive is mounted. You can find out what directory that is from within the filemanager, or by running the following command:
$ df -hOnce you cd into the directory of the USB drive, run the following:
$ md5sum -c md5sum.txtThis will take a little while, depending on your setup. Some checks will finish quicker than others. Overall, it might take a couple minutes. Wait for all the checks to complete. Here is what a successfull check will look like:
 casper/initrd: OK
 casper/vmlinuz: OK
 casper/filesystem.squashfs: OK
 casper/filesystem.manifest: OK
 casper/filesystem.size: OK
 casper/filesystem.manifest-remove: OK
| Attachment | Size |
|---|---|
| USB_Install_01.png | 36.26 KB |
| USB_Install_02.png | 41.64 KB |
| USB_Install_03.png | 14.11 KB |
| USB_Install_04.png | 17.6 KB |